
As an Amazon Associate I earn from qualifying purchases.
A national park day hike can fail before your boots touch dirt: the entry reservation you never booked, the trail permit handed out by lottery months earlier, the trailhead lot that filled at dawn. This step-by-step plan fixes that in order, walking you through choosing the park and trail, checking entry reservations and trail permits, timing the day, sorting parking and weather, and packing properly, so the only surprise left on the trail is the view itself.
See the System Working in One Real Park
Rocky Mountain runs one of the clearest timed-entry systems in the parks — read its trail guide alongside this plan and watch every step below play out.
Key Takeaways
- Choose the park and exact trail first, then check reservations, because every permit and parking rule attaches to a specific place and date.
- Treat entry reservations, entrance passes and trail permits as three separate things, and confirm each on the park’s official page before booking travel.
- Calendar every lottery and release date the day you pick the hike, because popular trails are allocated weeks or months ahead.
- Build the day backwards from a firm turnaround time, and start early enough to beat the heat and the parking rush.
- Recheck the forecast and alert page the night before and that morning, and switch to your backup trail when conditions say no.
Table of Contents
- Step 1: Choose Your Park and Trail First
- Step 2: Check the Entry Reservation System
- Step 3: Check Whether Your Trail Needs Its Own Permit
- Step 4: Time the Season, the Day and the Trailhead
- Step 5: Plan Parking, Shuttles and Trailhead Logistics
- Step 6: Check the Weather and Park Alerts Twice
- Step 7: Pack for the Hike You Actually Planned
- Step 8: Make Your Leave No Trace Plan Before You Go
- Step 9: Run the Final Check the Night Before
- Our view
- FAQ
- Sources
- Recommended
Step 1: Choose Your Park and Trail First
Start with a place, not a permit. Every reservation system, lottery and parking rule is tied to one park, one area and often one trailhead, so no booking question can be answered until the hike is chosen. The National Park Service’s own Plan Your Visit guidance runs in the same order: pick your park, then plan ahead around its fees, reservations and passes. Work the official pages and a proven trail guide together — our Rocky Mountain guide shows how one park’s trails, roads and entry system fit together, and the Yellowstone guide does the same where distances between trailheads change what a day can hold.
Match the trail to the weakest hiker in the group. Distance alone is a poor filter: elevation gain, altitude, exposure and surface decide whether a route is a pleasure or an ordeal. Read the difficulty honestly using our explainer on trail difficulty ratings, then shorten the plan until the whole group can finish with energy to spare.
Read the Official Trail Description Before You Commit
The park’s own trail page is the ground truth. Guidebooks describe the hike someone else had; the managing agency describes the trail as it is managed now, including water, exposure and seasonal hazards. The Grand Canyon day hiking page is the model: it states plainly that there are no easy trails into the canyon, warns against hiking rim to river and back in a day, and notes that permits are not required for ordinary day hikes there. Look for those three facts — real difficulty, turnaround warnings, and the permit position — on your park’s page before anything is booked.
Step 2: Check the Entry Reservation System
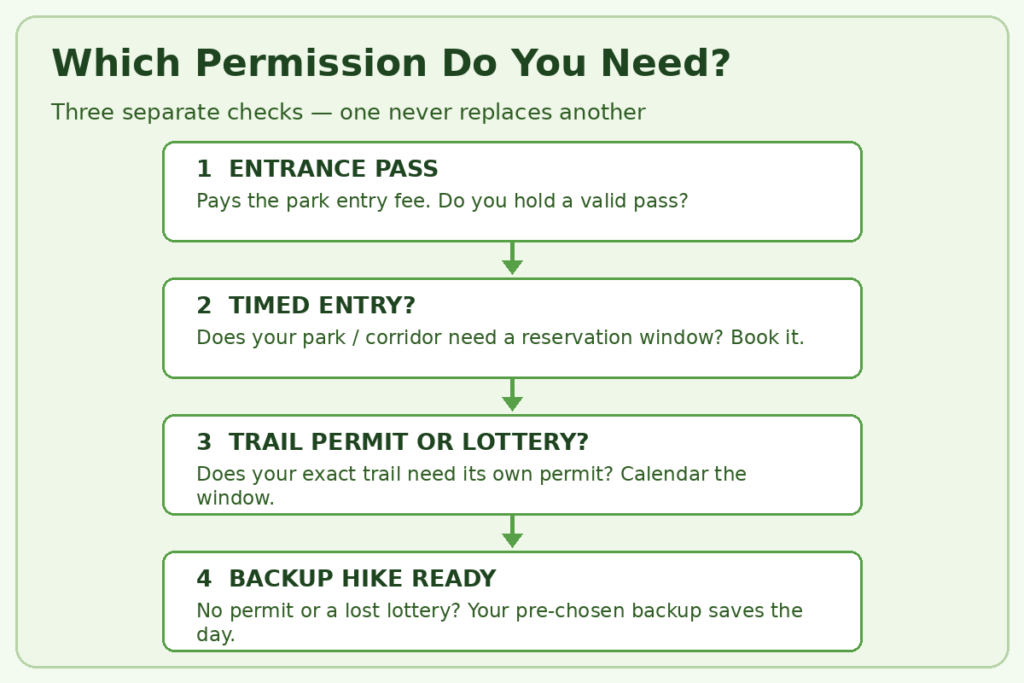
Separate the three kinds of permission before you check any of them. Hikers lose trips by confusing them: an entrance pass pays the entry fee, a timed-entry or vehicle reservation controls when you may drive in, and a trail permit controls one specific route. One never substitutes for another:
| Type | What it controls | How you get it | Watch out for |
|---|---|---|---|
| Timed entry / vehicle reservation | Driving into the park, or one busy corridor, during set hours | Booked ahead on Recreation.gov; enter inside a chosen window | Not an entrance pass; does not guarantee trailhead parking |
| Trail permit | One named trail or activity, often with a daily quota | Advance reservation, walk-up issue, or lottery, by trail | Entry permission does not include it; check the trail itself |
| Lottery permit | Oversubscribed trails where demand exceeds the safe daily number | Apply in a fixed window, often months ahead; sometimes a day-before round | Missing the window ends the plan; hold a backup hike |
| None required | Ordinary day hiking in most parks, on most trails | Nothing to book; entrance pass and preparation only | “None” applies to that trail, that date — confirm, never assume |
Check your exact park’s system, because no two run alike. Rocky Mountain’s timed entry system splits reservations into a general entry and a separate Bear Lake Road option, with entry inside two-hour windows in the managed season. Glacier’s vehicle reservations page shows the other lesson: systems are pilots that change or pause between seasons, so last year’s rules are background reading, never a booking. Work through our Glacier trail guide only after the current vehicle page has told you what this season requires.
Keep the Entrance Pass Separate in Your Head
A reservation is not a pass, and a pass is not a reservation. The NPS entrance passes page lays out the pass side: many parks charge an entrance fee, a standard or park-specific pass covers it, and the America the Beautiful interagency pass covers entrance fees across federal recreation sites. A digital version can be obtained through the Recreation.gov pass page. Whichever you hold, it pays the fee only — where timed entry also applies, you still book the slot. Write both on your checklist as separate lines.
Step 3: Check Whether Your Trail Needs Its Own Permit
Entry permission gets you into the park; it says nothing about your trail. A few famous day hikes carry their own permit systems because the route — a narrow chains section, a river corridor — cannot safely hold everyone who wants it. Zion shows both patterns: the Narrows permits page explains that the full top-down Narrows route needs a wilderness permit even as a very long day hike, while the bottom-up walk from the Temple of Sinawava is the classic no-permit alternative. Our Zion hikes ranked guide shows which routes sit on which side of that line.
Lottery trails are a calendar problem, solved months ahead or not at all. The clearest example is Angels Landing, where the permit for the chains section beyond Scout Lookout is issued only through the Recreation.gov lottery — a seasonal lottery applied to well in advance, ranking the days and times you can hike, plus a day-before lottery as the second chance. The durable procedure matters more than any season’s dates: find the application window on the official page the moment you choose the hike, calendar it with the result date beside it, and apply for the widest honest range of days you can use.
Always Hold a Backup Hike
A lottery you might lose is a plan with a hole in it. Decide at application time which no-permit trail becomes the day’s hike if the result goes against you — same area, similar effort, so the rest of the day survives. Yosemite makes the same point at park scale: its permits and reservations page separates entrance reservations from the permits individual activities carry, and its seasons show how quickly the entrance picture can change. Use our Yosemite trail guide to line up the alternatives before you need them.
Step 4: Time the Season, the Day and the Trailhead
Work in three time layers: season, day and hour. The season layer is general, not a fixed rulebook: high routes hold snow long after valley trails clear, desert routes turn dangerous in peak heat, and shoulder periods trade crowds for shorter, unsettled days — the park’s official pages describe each pattern, so read them in general terms, then confirm your actual dates. The Forest Service’s outdoor safety guidance makes the underlying point that preparation starts with knowledge of the area, the weather and the terrain. At altitude, add acclimatisation time before the big hike; our guide to altitude sickness on the trail explains the symptoms and the pacing that prevents them.
Build the day backwards from a firm turnaround time. Decide the latest moment you will turn around — set by daylight, the forecast’s storm window, heat, or the slowest hiker’s honest pace — and write it down before the hike, when the decision is cheap. Count backwards from it to your start time, with the trailhead arrival earlier still. Desert parks punish the opposite habit; on a Grand Canyon day the climb out comes last, in the heat — which is why that park tells hikers going down is optional and coming up is mandatory. A turnaround time you keep is worth more than a summit you chase.
Start Earlier Than Feels Necessary
The early start solves three problems at once. It puts the hard climbing in the cool of the morning, gets your vehicle into the lot before the rush, and buys the margin that absorbs a wrong turn or a slow companion without touching the turnaround time. Where a timed-entry window applies, aim for the front of your window, so a queue at the entrance station spends the system’s slack instead of your hiking time.
Step 5: Plan Parking, Shuttles and Trailhead Logistics
A reservation gets you through the gate; it does not park your car. Popular trailhead lots fill early and stay full, and the difference between a calm start and a circling one is logistics decided days earlier: which lot, which overflow option, and whether the park runs a shuttle that makes the car irrelevant. Some parks close busy corridors to private vehicles for part of the year and move everyone by shuttle. The Forest Service’s advice to recreate responsibly starts with the same discipline — know before you go, check the place for closures and restrictions, and download maps before signal disappears.
Screenshot or print everything before you leave coverage. Confirmations, permit PDFs, park map and trail description should be downloads on your phone and, for the permit, paper in a zip bag — trailheads sit exactly where signal is weakest. Note whether the trailhead has water and toilets. Our Rocky Mountain guide shows how shuttle corridors and trailhead clusters work in one of the busiest systems.
Have a Parking Plan B, Not Just a Hope
Decide the fallback before the lot decides for you. If the main lot is full, the pre-chosen answers are a named second trailhead, a shuttle stop that reaches the same trail, or the backup hike from Step 3 moved up to today. Never improvise at the roadside: no parking on vegetation, no blocked gates, no invented spaces — rangers ticket and tow in the busy parks. Build the fallback into the written plan where the whole group can see it.
Step 6: Check the Weather and Park Alerts Twice
Check twice: the night before, and again before you leave. The first check shapes the pack — layers, water volume, traction — and the second catches the alert posted overnight: a trail closure, a road problem, a water source reported dry, a storm arriving early. Alert pages outrank any forecast screenshot taken days earlier. Mountain weather is intensely local: trailhead, pass and valley floor can hold three different days at once, so read the forecast for the elevation you will actually hike at, not the town you slept in.
Know your park’s signature hazard and its rule. In lightning country the rule is to be off exposed high ground before storms build, and Yosemite’s lightning safety guidance is blunt: watch for towering thunderheads, descend early, and treat a substantial building or hard-topped vehicle as the only real shelter. In desert parks the hazard is heat paired with water scarcity; in river canyons, flash flooding after rain you may never see fall. Each park’s safety pages name its own version — read yours before the trip.
Respect Altitude and Heat as Scheduling Facts
Conditions are planning inputs, not trail surprises. The Sequoia trail safety page ties the threads together for high parks: weather turns quickly, elevation taxes unacclimatised hikers, hot-weather hiking demands hats, sunscreen and serious water, and the ten essentials belong in the pack for day hikes too. Translate that into schedule language: a high, exposed route gets the earliest start and the shortest version on a hot or unsettled day. Shortening a hike for conditions is the system working, not the day failing.
Step 7: Pack for the Hike You Actually Planned
Pack against the plan you wrote, not a generic list alone. The baseline is the essentials framework the American Hiking Society sets out — footwear, map and compass or GPS, water, food, rain gear and layers, light and whistle, first aid, sun protection and a pack to carry it all. Then adjust for this hike: permit printout and ID, the water volume the trail’s sources demand, and a light in case the finish runs into fading daylight. Our day hiking essentials checklist turns that framework into a tick-off list for the night before.
The daypack is the piece of gear this plan rides in. It must carry the essentials, the day’s water and food, and a layer, without bouncing or digging in across six or eight hours. If yours predates your ambitions, our roundup of the best hiking daypacks compares sizes and suspension styles, and the pack size guide settles how much volume a long day hike needs. Load it the night before, permit and map on top.
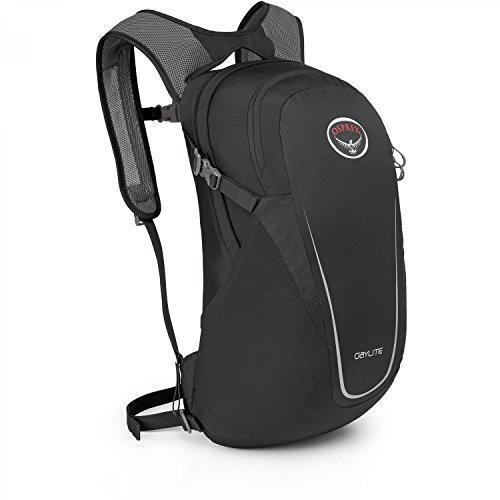
Osprey Daylite Daypack
- Large panel loading main compartment provides accessibility to inside contents
- Dual stretch mesh side pockets provide additional storage options
- The multi-function interior sleeve can be used for either a hydration reservoir or tablet
Dress for the Trailhead You Will Finish At
Sun and exposure are planned, not endured. A wide-brim hat, sunscreen reapplied on schedule and light covering layers beat the burn-and-shiver cycle that ruins afternoons — at altitude or in desert sun, the hat earns its place from the first mile.

Sunday Afternoons Adventure Hat
- MAXIMUM SUN COVERAGE: Stay protected under intense sun with UPF 50+ fabric, a 4″ brim, and 7.5″ neck cape. Shields face, ears, and neck from UV rays and ideal for hiking, fishing, and long outdoor days.
- ADJUSTABLE + SECURE FIT: Custom sizing and adjustable chin strap keep the hat steady in wind or activity. Available in small/medium and large/x-large to ensure lasting comfort wherever you roam.
- COOL & COMFORTABLE: Moisture-wicking sweatband and ventilated mesh side panels boost airflow to keep you dry and cool on the trail or water. Lightweight design even floats if dropped.
New starting from: 54.00 $
Go to Amazon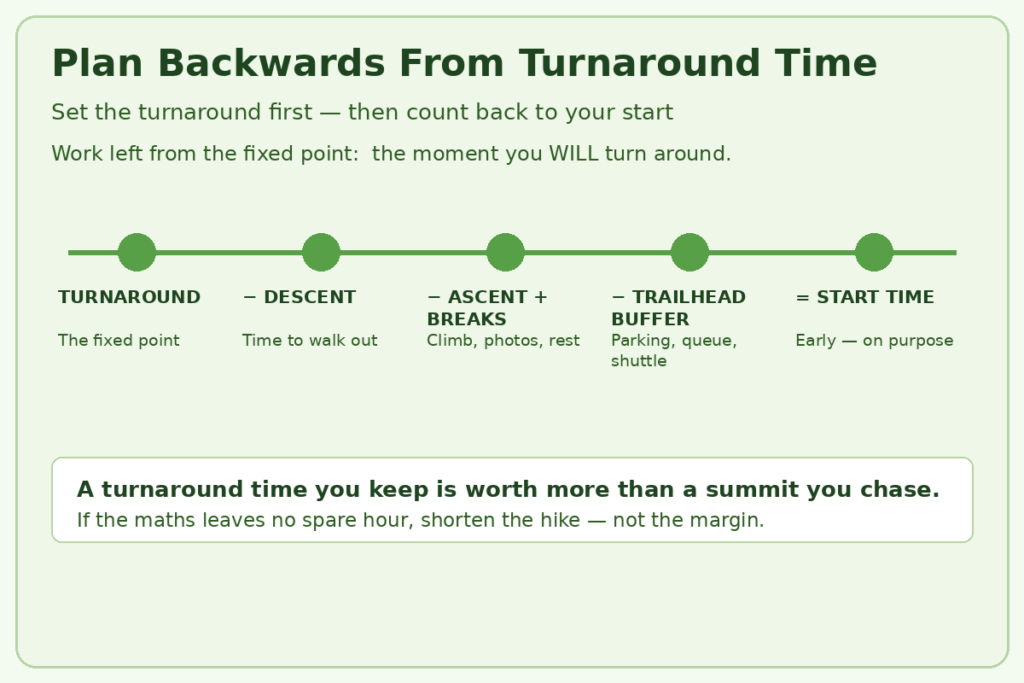
Step 8: Make Your Leave No Trace Plan Before You Go
Leave No Trace is a packing and planning decision, not a trail mood. The NPS summary of the Leave No Trace principles opens with the one this whole article follows — plan ahead and prepare — and continues through durable surfaces, proper waste disposal, leaving what you find, respecting wildlife and considering other visitors. For a day hike the translations are concrete: a small bag for every wrapper, food repackaged at home, staying on the trail through mud rather than widening it, and wildlife watched from a distance, never fed.
In bear country, food storage is part of the day plan. Know before you arrive whether the park expects food in a vehicle, a trailhead locker, or an approved container on longer routes, and follow that park’s current instruction exactly. Our comparison of the best bear canisters explains the container types and where each is required or simply wise.

BearVault BV500 Bear Canister
- Every ounce matters! The BV500 excels as a high volume, lightweight bear barrel for backpacking. The most spacious choice of bear canister for backpacking ultralight style, pack food for 7 plus days.
- Clear and easy to use: Easily find your breakfast. Transparent sides and a wide opening make it easy to find. Tool-free, with rounded corners and pack straps, it packs easily. Doubles as a camp stool!
- Tested and Approved: Grizzly (IGBC) and Black Bear (SIBBG) certified bear resistant container. Keep your food and scented items protected from raids by bears and other wildlife.
New starting from: 99.95 $
Go to AmazonStep 9: Run the Final Check the Night Before
Close the loop with one written trip plan. The National Park Service’s Trip Plan guidance recommends leaving a written plan — park, trail, vehicle, expected return — with a trusted contact who is not on the trip, and is explicit that the plan is not a permit and does not replace one. Add your reservation window, turnaround time and backup hike to the same sheet. Then: alerts checked, forecast checked, pack loaded, permit and pass in hand, alarm set for the early start from Step 4.
Know where this plan ends and the next one begins. Everything above is day-hike planning: you sleep in a bed, and the permits in play cover entry, vehicles and individual trails. Once the trip includes a night on the trail, a different system takes over — wilderness permits, campsite quotas, food storage rules — and our guide to planning a multi-day backpacking trip is the step-by-step for that world. Never let a day-hike plan drift into an unplanned overnight; if the day goes wrong, the correct move is out, not onward.
Our view
Every national park trip I have seen go sideways failed on paper first — a reservation nobody checked, a lottery window that closed in spring, a lot that filled while the group bought coffee. The fix is boring and it works: run the steps in order, from the Rocky Mountain guide’s timed-entry reality to the essentials checklist the night before, and keep the multi-day planning guide for when a day hike turns into an ambition. Paperwork first; then the trail takes care of itself.
— Brian Ka
FAQ
Do I need both an entrance pass and a timed-entry reservation?
Often, yes — they are different products. The pass pays the entrance fee; the reservation, where a park uses one, controls your entry window. Holding one never covers the other, so check both on the park’s official page for your dates.
How far ahead should I start planning a national park hike?
As soon as the hike is chosen. Lottery applications and reservation releases can open weeks or months before the hike date, while ordinary trails need only days. Check the official pages at decision time and calendar every window you find.
What happens if I lose the lottery for the trail I wanted?
You hike the backup you chose in advance. Lotteries for oversubscribed trails are designed so many applicants miss out; a pre-chosen no-permit alternative in the same area keeps the day intact. Reapply in any day-before round offered, but plan as if it will also say no.
Does a timed-entry reservation guarantee trailhead parking?
No. Entry reservations manage vehicles through the gate, not spaces at one lot. Popular trailheads still fill early — hence the early start, a shuttle option where one exists, and a named fallback trailhead.
Where do I check for last-minute trail closures or alerts?
On the park’s official alert and current-conditions pages, the night before and again in the morning. They carry closures, road problems and hazard warnings as rangers post them, and outrank guidebooks, apps and anything read at first planning.
Questions About Planning a National Park Hike?
Tell us which park, which trail and when you are going, and we will help you work out which reservations, permits and start times your day actually needs.
Sources
- National Park Service — Plan Your Visit
- National Park Service — Day Hiking, Grand Canyon National Park
- National Park Service — Timed Entry Permit System, Rocky Mountain National Park
- National Park Service — Vehicle Reservations, Glacier National Park
- National Park Service — Entrance Passes
- Recreation.gov — America the Beautiful Pass
- National Park Service — The Narrows Permits, Zion National Park
- Recreation.gov — Angels Landing Permits, Zion National Park
- National Park Service — Permits & Reservations, Yosemite National Park
- USDA Forest Service — Safety: Outdoor and Recreation
- USDA Forest Service — Remember to Recreate Responsibly
- National Park Service — Lightning Safety, Yosemite National Park
- National Park Service — Trail Safety, Sequoia & Kings Canyon National Parks
- American Hiking Society — The 10 Essentials of Hiking
- National Park Service — Leave No Trace
- National Park Service — Trip Plan