
As an Amazon Associate I earn from qualifying purchases.
A trail labelled moderate can be a relaxed morning walk in one park and a leg-burning climb that ruins your weekend in another, because there is no single national standard behind the word. This explainer fixes that confusion in order: what a difficulty rating actually measures, how distance, elevation gain, terrain and altitude combine to set it, why the same label shifts from place to place, and how to judge any trail for yourself before you commit to it.
See Moderate Trails Rated Honestly, Park by Park
Compare real trail distances, climbs and difficulty labels side by side in our Rocky Mountain guide before you pick your next route.
Key Takeaways
- Read the distance and elevation gain behind every label, because the word moderate alone tells you almost nothing useful about your day.
- Judge steepness by elevation gain per mile, not total gain, since a short steep climb punishes far more than a long gentle one.
- Check terrain, altitude and exposure separately, because no simple rating formula captures rock, roots, scrambling or thin mountain air.
- Rate any unlabelled trail yourself using distance, gain, surface, altitude and daylight before you trust someone else’s casual description of it.
- Match the trail to the least experienced person in your group, and turn back early whenever the real trail outruns its rating.
Table of Contents
- What a Difficulty Rating Actually Measures
- The Five Labels, Translated Into Real Walking
- Why Moderate Means Different Things in Different Places
- Distance: The Number Everyone Reads First
- Elevation Gain: The Number That Decides the Day
- Terrain, Surface and Exposure: What Numbers Miss
- Altitude, Weather and Daylight: The Hidden Multipliers
- How to Rate a Trail Yourself in Five Checks
- Matching the Rating to Your Group
- Gear Decisions That Change How a Rating Feels
- Our view
- FAQ
- Sources
- Recommended
What a Difficulty Rating Actually Measures
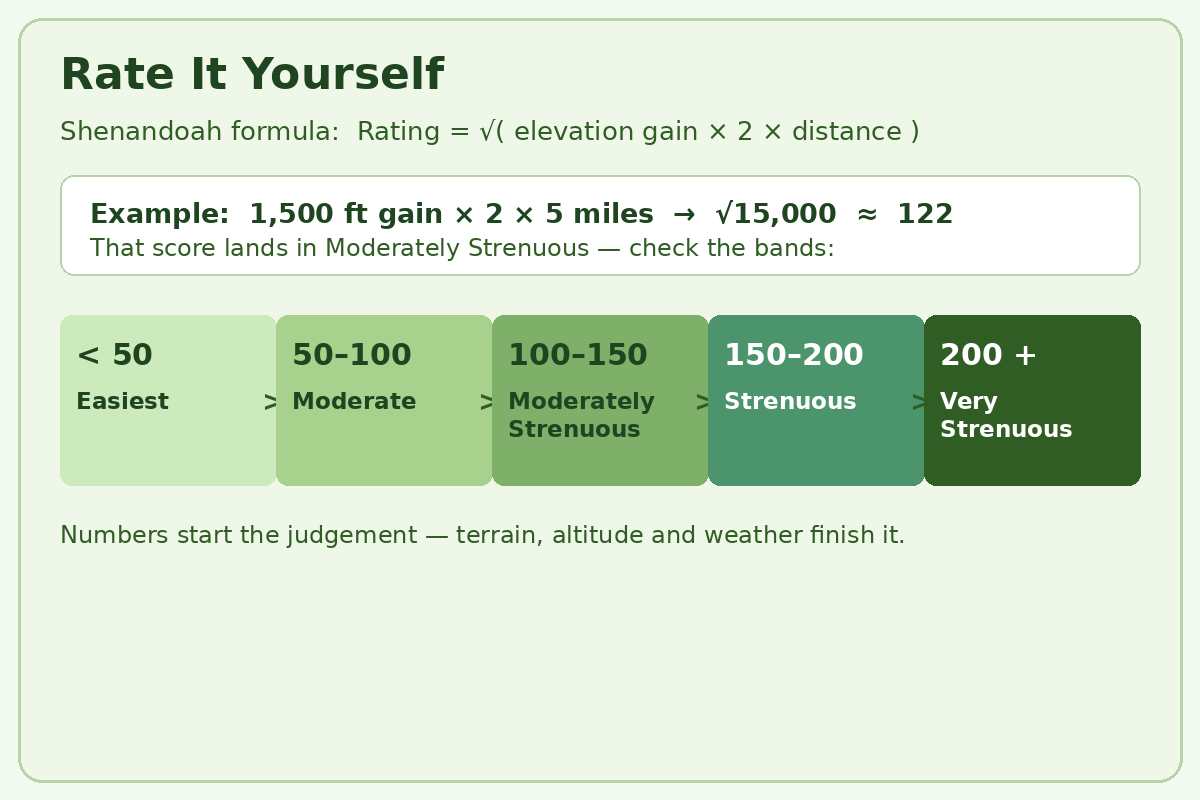
A difficulty rating is a compressed judgement, not a measurement. Behind every easy, moderate or strenuous label sits a land manager, guidebook author or trail organisation squeezing several factors into one word. The most transparent example comes from Shenandoah, where Shenandoah National Park publishes its actual formula: elevation gain in feet, multiplied by two, multiplied by the distance in miles, square-rooted into a numerical rating that falls into one of five bands. The park is honest about the limits, noting that the formula approximates difficulty and is imperfect.
Most systems weigh the same core ingredients. Distance and total climbing do most of the work, with terrain and exposure layered on top where the rater includes them. The National Park Service hiking guidance makes the same point from the other direction: know your limits and plan around your ability, because the label on a sign does none of that thinking for you. When you browse routes in our Rocky Mountain trail guide, read the distance and gain beside each label rather than trusting the label alone.
| Rating | Typical distance | Typical character | Who it suits |
|---|---|---|---|
| Easiest / Easy | Generally under 3 miles | Mostly level or a slight incline, maintained surface | Anyone who enjoys walking, first hikes, families |
| Moderate | Generally 3 to 5 miles | A steady incline with some steeper sections | Novice hikers who want a bit of a challenge |
| Moderately Strenuous | Generally 5 to 8 miles | Steady and often steep climbing, rougher tread | Regular walkers with some conditioning |
| Strenuous | Generally 7 to 10 miles | Longer and steeper, or rated up for heavy elevation gain | Fit, experienced day hikers |
| Very Strenuous | Generally 8 miles and over | Long and steep, may include scrambling and stream crossings | Well-conditioned, well-prepared hikers only |
The One Formula You Can Check Yourself
Shenandoah’s bands give the labels hard edges. A numerical rating below 50 is Easiest, 50 to 100 is Moderate, 100 to 150 is Moderately Strenuous, 150 to 200 is Strenuous, and above 200 is Very Strenuous, as set out on the Shenandoah difficulty page. The park’s planning paces slow as the bands rise, from about 1.5 miles per hour on the easiest trails to about 1.2 on strenuous ground — the hidden lesson being that harder trails take disproportionately longer.
Club systems land in a similar place by a different route. The Washington Alpine Club rates trips by distance and gain together, calling up to eight miles with under 1,200 feet of gain easy, up to twelve miles with 1,200 to 2,500 feet moderate, and anything beyond that strenuous or very strenuous. Both systems still describe a fit adult in reasonable conditions, which is exactly where personal judgement has to take over.
The Five Labels, Translated Into Real Walking
Easiest means walking, not hiking, in the best sense. Expect a maintained path, gentle grades and a distance most people cover without thinking about fitness, which is why our beginner Rocky Mountain hikes concentrate on this band for first mountain trips. The preparation baseline still applies: the American Hiking Society essentials list belongs in the pack on an easy trail too, because weather and wrong turns do not check the rating before they happen.
Moderate is where honest self-assessment starts. In Shenandoah’s wording, a moderate hike suits novice hikers seeking a bit of a challenge, with a moderate incline and some steeper sections over generally three to five miles. Expect to breathe hard on the climbs and still finish with energy in reserve if you walk regularly. The beginner guidance in REI frames the same decision well: honestly assess your fitness, your available time and how much elevation gain you can comfortably handle.
Where Strenuous Stops Being a Stroll
Moderately strenuous is the band that catches people out. The distance looks manageable, but the climbing is steady and often steep, and Shenandoah warns it will generally challenge an unconditioned person. Strenuous challenges most hikers outright, and very strenuous adds length, steepness and possibly rock scrambling and stream crossings. If your recent walking is flat and short, treat anything from moderately strenuous upward as a training goal, and build toward it on the gentler routes in our Yosemite trail guide.

Why Moderate Means Different Things in Different Places
There is no universal standard, and that is the whole problem. One park uses a published formula, a neighbouring forest may use trail class and grade, and a hiking app blends user reports into a crowd-sourced label. The Forest Service know-before-you-go guidance pushes the responsibility back where it belongs: research the specific area and its demands before you go. A moderate trail among the high peaks in our Glacier trail guide starts at altitude on exposed ground; a moderate lowland trail may never leave a gravelled path.
Local calibration quietly shifts every label. Raters judge a trail against the other trails they manage, so the middle label in a steep mountain park describes harder walking than the middle label in gentle hill country. Heat, snow cover and stream levels also move a trail up or down a band without anyone reprinting the sign. The planning principle at the heart of Leave No Trace — plan ahead, know the area’s special concerns, and prepare for weather and emergencies — is really a difficulty instruction in disguise.
Read the Numbers, Not the Adjective
The fix is to demote the word and promote the data. Pull four figures before you decide: round-trip distance, total elevation gain, the highest point, and the steepest sustained section if a profile is available. Compared against walks you have already done comfortably, those numbers predict your day far better than any adjective. Our day hiking checklist then turns that judgement into a packing list scaled to the day you actually chose.
Distance: The Number Everyone Reads First
Distance sets the floor of the effort, nothing more. Five flat miles and five steep miles share a number and almost nothing else. Use distance first to set your time budget, then correct it for climbing and terrain. Shenandoah’s planning paces are a useful reality check: even its easiest trails are planned at about a mile and a half per hour, far slower than most people’s pavement pace.
Long and gentle still adds up. A very long easy trail stretches your water, food and daylight margins even when no single section feels hard. The Forest Service field guidance — carry extra clothing, water and emergency items scaled to the trip — matters most on these deceptive days. If a long route means a bigger load, check it against our pack size guide rather than stuffing a small daypack past comfort.
Elevation Gain: The Number That Decides the Day
Total climbing is the strongest single predictor of how a trail feels. REI’s beginner guidance puts a memorable marker on steepness: a trail that gains 1,000 feet in one mile is considered quite steep, and a general planning rule adds about an hour for every 1,000 feet of gain. Divide total gain by distance to get gain per mile, the steepness figure experienced hikers compare first: a few hundred feet per mile walks like a hill, while sustained gains near that 1,000-feet mark walk like a staircase.
Gain also decides what you must carry and treat. Longer, higher days demand more water and a real treatment plan. The CDC explains that boiling is the most effective way to kill germs in backcountry water, with filtering followed by disinfection next best — the standard to plan against whenever a strenuous rating stretches your day. Our backpack packing guide shows how to keep heavy items close to your back so the load adds no difficulty of its own.
Terrain, Surface and Exposure: What Numbers Miss
The formula cannot feel the ground under your boots. Shenandoah gives the perfect example: its Dark Hollow Falls hike scores in the easiest band by the numbers, yet the park rates it moderate because the trail is steep and rocky in a way the formula cannot see. Roots, loose rock, mud and stream crossings tax balance and ankles continuously, and none appear in a distance-and-gain calculation. On rough, steep ground the guidance in our boot choosing guide matters more than the rating does, because the right support changes how the terrain feels.

Merrell Moab 3 Mid Waterproof Hiking Boots
- Women’s Waterproof Hiking Boots: Waterproof and breathable membrane helps keep feet dry and comfortable on wet trails and rough terrain.
- Durable Leather & Mesh Upper: Pigskin leather combined with breathable mesh delivers long-lasting durability, ventilation, and abrasion resistance.
- All-Day Comfort & Arch Support: Removable contoured footbed, reinforced heel cushioning, and molded nylon arch shank provide stability and support for extended hikes.
New starting from: 149.8 $
Go to AmazonExposure changes the consequences, not just the effort. A narrow path above a steep drop demands composure and sure footing even when it asks no extra fitness, and scrambling — using hands for balance or progress — is the clearest terrain step-up of all. Read route descriptions for the words scramble, ledge, exposed and unmaintained, and treat each one as a band increase until you have the skills it assumes. Dog owners should apply the same caution, since the routes in our hiking dogs guide assume paw-friendly tread that exposed, rocky trails often fail to provide.
Ticks, Brush and the Slow Difficulties
Some difficulty arrives quietly. Brushy trail edges raise tick exposure on otherwise easy walks, and the CDC advises walking in the centre of trails and avoiding high grass and leaf litter where practical. Wet roots and leaf-covered descents punish tired legs late in the day, which is why experienced hikers budget concentration as carefully as water.
Altitude, Weather and Daylight: The Hidden Multipliers
Altitude rewrites a rating without touching the trail. High park routes begin where the air is already thin, and the park’s own Rocky Mountain hiking guidance treats preparation, pacing and acclimatisation as part of the hike rather than optional extras. A moderate label at high elevation asks more of your breathing than identical figures at sea level, so visitors from low country should choose a band below their home standard for their first days.
Weather moves trails between bands in hours. Rain turns roots and rock slick, heat multiplies water needs, and snow hides tread and markers. The preparation guidance for Zion National Park stresses planning, self-reliance and readiness for an unexpected night out, and that mindset scales down to day hikes: check the forecast for the elevation you will actually reach, and let a bad forecast demote your plan a full band without argument.
Daylight Is a Difficulty Factor
A rating assumes you finish in the light. Short days compress your margin until a moderate trail becomes a race, and the essentials framing in REI — headlamp included — exists because finishing after dark is a common, preventable failure. Work backwards from sunset at the planning pace for your band, and if the arithmetic does not fit with an hour to spare, the trail is too difficult for that day regardless of its label. Persistent aches late in the day are a signal to check pack fit using our shoulder pain guide.
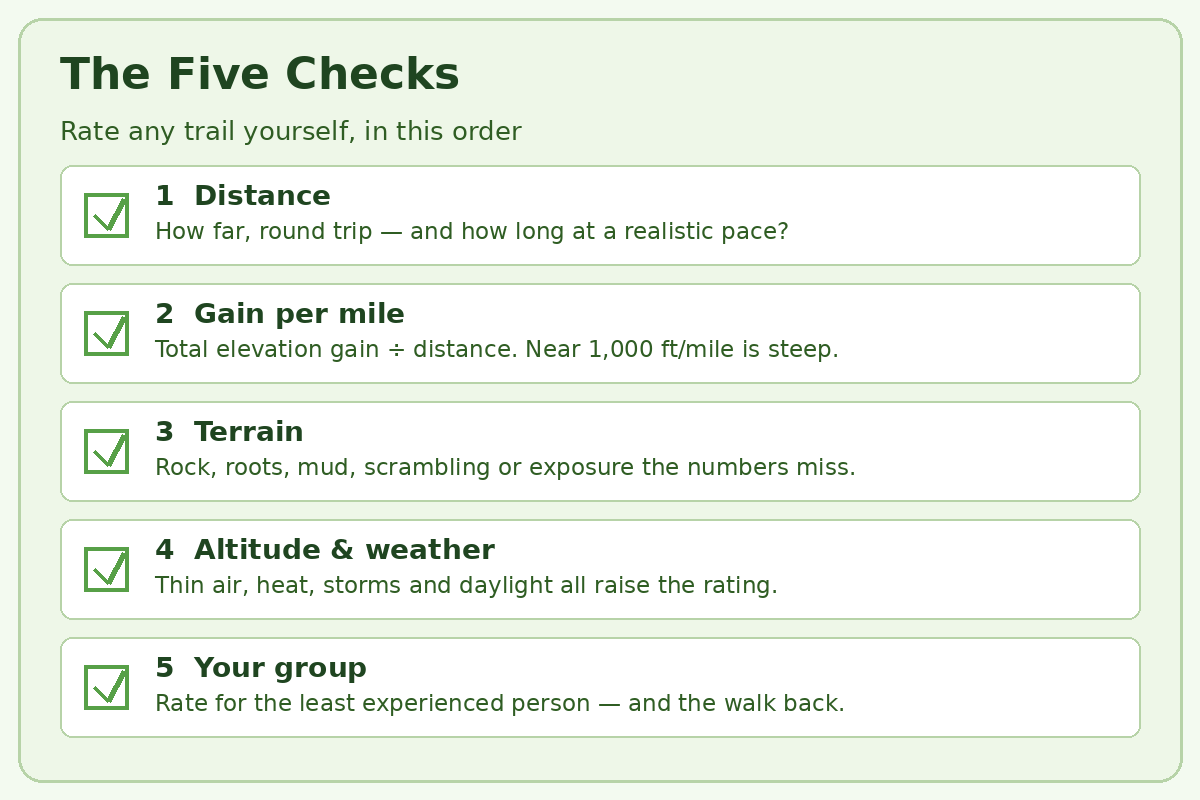
How to Rate a Trail Yourself in Five Checks
First, total the real distance and gain. Use round-trip figures and total climbing, then run Shenandoah’s formula as a starting score: gain multiplied by two, multiplied by miles, square-rooted. It anchors your judgement in the one published system any hiker can reproduce, and it exposes listings whose cheerful labels contradict their own numbers.
Second, grade the steepness and the surface. Work out gain per mile, then read the route description for tread: maintained, rocky, rooted, sandy, snowy or off-trail. Add a band for sustained steepness, and another for scrambling or serious exposure. The destination advice for first backpacking trips in REI — err on the side of easy and keep early elevation gains modest — is the correct bias at every experience level.
Checks Three to Five: Altitude, Conditions, Group
Third, adjust for altitude and forecast. High routes, heat, storms or snow each push the effective rating up. Fourth, compare against a hike you know: if a known moderate left you exhausted, believe your legs over any new label. Fifth, rate for the slowest member and the return trip, because descents punish knees and concentration. Poles change this last calculation on steep ground, and our trekking pole technique guide explains the downhill braking that can make a strenuous descent feel a full band kinder.

Cascade Mountain Tech Trekking Poles
- Exceptional Quality and Comfort – Crafted from aircraft-grade 6061 aluminum, each 10-ounce trekking pole is highly durable in all conditions.
- Quick Lock Mechanism – Designed with rugged terrain in mind. Easily adjust your trekking poles from 26”- 54” without breaking your stride.
- Cork Grip with Extended EVA Down Grip – Ergonomic cork grip helps reduce vibration from uneven terrain. Extended EVA down grip provides additional hand placement options for steep climbs and varied trail conditions.
New starting from: 29.99 $
Go to AmazonMatching the Rating to Your Group
A group hikes at its least prepared member’s rating. Children, new hikers and anyone returning from injury compress the honest label, sometimes by two bands. The Washington Alpine Club pairs its difficulty bands with separate pace ratings, acknowledging that the same route is a different undertaking at a different speed. Plan the turnaround time before you start and treat reaching it as success — the National Park Service guidance to know your limits and turn back is what keeps a misjudged rating from becoming an incident.
Dogs get a vote too. Heat, rough tread and water availability limit a dog sooner than most owners expect, and a strenuous human rating can be an unfair ask of an older or small dog. Build canine days from the preparation in our best hiking dogs coverage, and remember that a label written for people says nothing about paws or scrambling. When in doubt, the dog’s band wins.
Building Up a Band at a Time
Progression is how ratings become useful instead of intimidating. Finish a band comfortably before sampling the next one, and increase only one variable at a time: distance or gain or terrain, never all three together. Keep a simple record of what you walked and how it felt, and within a season you will own a personal translation table no park sign can give you. That record also tells you when your kit is the limiting factor, which is the moment our backpack roundup and the 50L pack guide become more useful than another mile of training.
Gear Decisions That Change How a Rating Feels
Footwear is the first lever. A supportive boot on rocky, steep tread reduces ankle work and downhill slipping, while a light shoe on a smooth easy path saves energy all day. Match the choice to the terrain using our guides to men’s hiking boots and women’s hiking boots, and never debut untested footwear on a strenuous rating.
Poles are the second lever, and load is the third. Poles share work with your arms on climbs and brake you on descents, which is why the options in our hiking poles guide earn their place on any route whose description leans on the word steep. Every unnecessary pound of load raises the effective difficulty, so pack from the essentials outward and let a heavy pack demote your chosen band for the day.
Our view
My rule is simple: never let one word plan your day. Read the numbers behind the label, test them against the routes you know in our Rocky Mountain trail guide, prepare with the day hiking checklist, and choose footwear with the boot choosing guide when the terrain earns it, and moderate starts meaning the same thing everywhere it matters — on your own two legs, on the day you actually walk it.
— Brian Ka
FAQ
What does moderate actually mean on a hiking trail?
A real but manageable challenge for a novice hiker. In the Shenandoah system it means a numerical rating of 50 to 100, generally three to five miles with a moderate incline and some steeper sections — sustained climbing, some rougher tread, and a finish that leaves a regular walker tired but satisfied.
Is there one standard system for trail difficulty ratings?
No, and that is the central caution of this guide. Shenandoah publishes a formula, forest and club systems use their own bands, and apps blend editorial and user judgement. Compare trails using distance, total elevation gain, gain per mile, terrain and altitude — the figures every system starts from — instead of comparing adjectives.
How do I work out elevation gain per mile, and why does it matter?
Divide the total elevation gain by the round-trip distance. A trail gaining 1,500 feet over five miles averages 300 feet per mile, a rolling effort, while the same gain over two miles averages 750 feet per mile and walks far more steeply. Gain per mile captures the steepness your legs actually argue with, which total gain alone hides.
Can a short trail still be strenuous?
Yes, when the climbing or terrain is concentrated. A brief route with very steep pitches, loose rock or scrambling can challenge most hikers despite its distance, and Shenandoah’s Dark Hollow Falls example shows a short hike rated above its formula score because of steep, rocky tread. Read the terrain description alongside the mileage before deciding a short trail is an easy one.
What should beginners do with difficulty ratings?
Start a full band below where you think you belong. Choose easy routes first, note how the distance and gain felt, and step up only when you finish comfortably with energy in reserve. Carry the essentials, plan a turnaround time, and let recorded experience — not optimism — promote you to moderate and beyond.
Questions About Trail Difficulty Ratings?
Not sure whether a trail’s rating matches your fitness, your group or your dog? Send us the route and its numbers and we will help you read it honestly.
Sources
- National Park Service — How to Determine Hiking Difficulty, Shenandoah National Park
- National Park Service — Hiking Safety
- National Park Service — Hiking, Rocky Mountain National Park
- National Park Service — Leave No Trace Seven Principles
- National Park Service — Backpacking Safety and Regulations, Zion National Park
- American Hiking Society — The 10 Essentials of Hiking
- USDA Forest Service — Know Before You Go
- USDA Forest Service — Brave the Elements, Black Hills National Forest
- REI — Hiking for Beginners: Getting Started
- REI — Backpacking Tips for Beginners: Getting Started
- REI — The Ten Essentials
- CDC — Water Treatment Options When Hiking, Camping, or Traveling
- CDC — Preventing Tick Bites
- Washington Alpine Club — WAC Outings Standards