
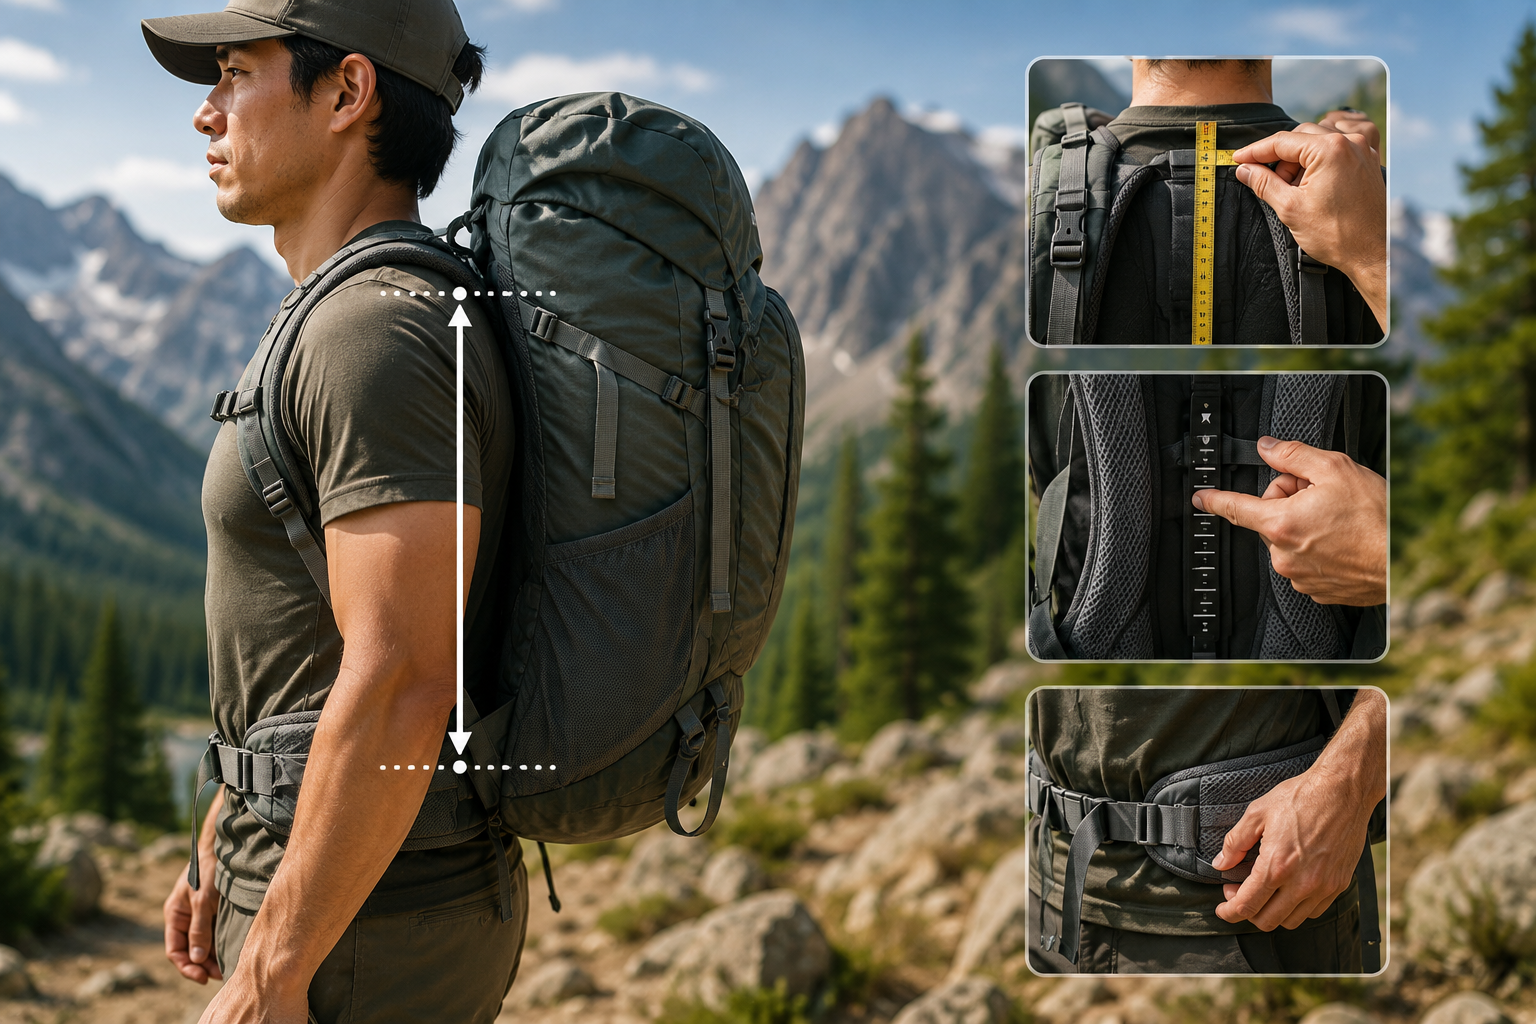
Most backpack fit problems have nothing to do with your height and everything to do with a single measurement most hikers have never actually taken: torso length. Two people who are both 5’6″ can have genuinely different torso lengths depending on how their proportions break down between legs and spine, which is exactly why height-based sizing charts routinely steer hikers toward the wrong pack. Get torso length right, and a pack transfers weight to your hips the way it’s supposed to. Get it wrong, and even a genuinely well-reviewed, expensive pack will leave you with sore shoulders and a hip belt riding in the wrong place regardless of how good the suspension technology is on paper.
This guide covers exactly how to measure your torso length correctly, what that number actually tells you about pack sizing, and how to fine-tune fit once you’ve found a pack in the right range. For the packs themselves once you know your size, hikingbackpackpro.com’s guides on backpacks for tall women and backpacks for petite frames cover specific products across the torso-length range this guide will help you identify.
Why Height Is the Wrong Number to Shop By
Height-based sizing charts persist because height is easy to measure and easy to advertise, but it’s genuinely a poor proxy for the measurement that actually determines pack fit. A pack’s suspension system — the shoulder straps, the load lifters, the hip belt — is engineered around torso length specifically, meaning the distance along your spine from the base of your neck to the top of your hip bones. Two hikers of identical height can have torso lengths that differ by two or three inches depending on whether their proportions run long in the legs or long in the spine, and that difference is exactly large enough to push one of them into a pack that fits well and the other into a pack that genuinely doesn’t.
This is why the single most useful thing you can do before shopping for a pack — more useful than reading reviews, more useful than comparing suspension technologies — is measuring your own torso length directly rather than relying on a height chart to estimate it for you.
How to Measure Your Torso Length
Find your C7 vertebra first. Tilt your head forward and run your fingers down the back of your neck; the C7 vertebra is the noticeably prominent bump where your neck meets your shoulders — it’s usually the most protruding bump you’ll feel in that area. This is your starting point.
Find your iliac crest next. Place your hands on your hips with your thumbs pointing toward your spine; the iliac crest is the top of your hip bones, roughly level with where a properly fitted hip belt should sit. Draw an imaginary line between the top of both iliac crests — this is your ending point.
Measure the distance between the two points along the curve of your spine, ideally with a flexible tape measure and a second person helping, since measuring your own back accurately alone is genuinely difficult. Stand naturally upright rather than arching or slouching, since either posture will throw off the measurement in a way that doesn’t reflect how you actually stand while hiking.
Record the number in inches, since most manufacturer sizing charts use inches as the standard unit even if the rest of a product listing uses metric measurements elsewhere.
Translating Your Measurement Into a Pack Size
Once you have your torso length in hand, most backpack manufacturers use a broadly similar size range, though the exact cutoffs vary slightly by brand:
Extra small or short torso generally covers roughly 15 to 17 inches, appropriate for petite hikers whose torso length falls meaningfully below the standard range most unisex and women’s-medium packs are built around.
Small or medium torso generally covers roughly 17 to 19 inches, the range most standard women’s-specific and many unisex packs default to as their base size.
Medium or large torso generally covers roughly 19 to 21 inches, often the standard default size for men’s and unisex packs.
Large or extra-large torso generally covers roughly 21 inches and above, appropriate for genuinely tall hikers whose torso length exceeds what a standard-range pack’s adjustment can accommodate even at its longest setting.
These ranges are a starting point rather than an absolute rule — always check the specific manufacturer’s own sizing chart for the exact pack you’re considering, since brands genuinely vary in where they draw these cutoffs, and a torso length sitting right at a boundary between two sizes may fit differently depending on the specific brand’s adjustment range.
Why Adjustable Torso Systems Still Matter
Even once you’ve identified the correct base size, most quality hiking packs include some form of adjustable torso system — a sliding yoke, a ladder-lock mechanism, or a Velcro-adjustable harness — that lets you fine-tune fit within that size range rather than being locked into one fixed position. This matters for a genuinely practical reason: your measured torso length is a single number, but the “correct” position for a pack’s shoulder harness can shift slightly depending on how a specific load is packed, how thick your clothing layers are on a given day, and simple day-to-day variation in exactly how you’re standing when you put the pack on.
A pack with a wide adjustment range gives you real room to dial in that fine-tuning; a pack with a narrow or nonexistent adjustment range depends entirely on the base size being correct from the start, with much less room to correct a fit that’s slightly off.
Confirming Fit Once the Pack Is Loaded
Measuring torso length correctly gets you into the right size range, but the final confirmation happens with the pack actually loaded and on your body, not empty on a store shelf or measured against a size chart alone.
Load the pack with real weight before assessing fit. An empty pack tells you almost nothing about how the suspension actually performs — load it with roughly the weight you’d genuinely carry on a real trip before making any final judgment about fit.
Check that the hip belt sits directly on your iliac crest, not above or below it. This is the single most important fit checkpoint. A hip belt riding too high sits on your waist rather than your hip bones and can’t transfer weight the way it’s designed to; a hip belt riding too low drops onto your upper thighs and creates a completely different, uncomfortable pressure pattern.
Confirm the shoulder straps wrap over your shoulders and curve down against your upper back without gapping. A gap between the strap and your shoulder means the harness isn’t actually making the contact it needs to for proper load distribution, regardless of how correct the torso length measurement was on paper.
Test the load lifter straps, the angled straps running from the top of the shoulder harness to the top of the pack frame. These should sit at roughly a 45-degree angle from your shoulder to the pack; a genuinely correct torso length puts these straps in a position where tightening them noticeably pulls the pack’s weight closer to your back, rather than having no real effect because the geometry is already wrong.
Walk around with the loaded pack for several minutes, not just standing still in front of a mirror. Fit that feels acceptable standing still can reveal real problems once you’re actually moving — a hip belt that shifts, a shoulder strap that starts digging in, or a pack that sways unexpectedly are all things that only show up in motion.
What to Do If You’re Between Sizes
A torso length that falls right at the boundary between two adjacent sizes is a genuinely common situation, and there’s no universal rule for which direction to go — it depends on the specific pack’s adjustment range and your own priorities. As a general starting point, sizing down tends to keep the hip belt riding correctly on the iliac crest with room to extend the adjustment upward if needed; sizing up risks a hip belt that can’t be adjusted small enough to sit correctly, which is generally the more consequential fit failure of the two. If a specific pack’s sizing chart genuinely straddles your measurement, prioritize trying it on loaded before assuming either size is automatically correct.
Conclusion
Fitting a hiking backpack correctly starts with a single measurement — the real distance along your spine from your C7 vertebra to your iliac crest — rather than your overall height, which is a genuinely unreliable proxy for how a pack’s suspension system will actually perform on your body. Measure carefully, ideally with help, translate that number against the specific manufacturer’s own sizing chart rather than a generic range, and always confirm the final fit with the pack genuinely loaded and worn in motion rather than judged empty or standing still.
Get torso length right from the start, and the rest of pack shopping — capacity, suspension style, price — becomes a much more straightforward decision than it is when fit itself is still an open question.